This ergonomic desk setup checklist is built differently. Most guides online are generic checklists rewritten from the same source material. They list 15 things to fix, don’t tell you what order to fix them in, and reference no actual ergonomic research.
Currency note: Canadian dollar equivalents use the Bank of Canada daily average of 1 USD = 1.4014 CAD on July 17, 2026. Converted amounts are approximate; the original US price is shown in brackets.
This guide does the opposite. It’s organized as a prioritized sequence do step 1 first, because step 1 being wrong often makes steps 2 through 8 also feel wrong. It draws on the actual ergonomic guidelines from OSHA, NIOSH (the U.S. National Institute for Occupational Safety and Health), and the Canadian Centre for Occupational Health and Safety, all of which are freely available and worth bookmarking.
Most people can work through this checklist in 30 minutes using equipment they already own, at which point they’ll know whether they actually need to buy anything and what. The goal is a setup that disappears into your workflow one you don’t notice because nothing hurts.
Table of Contents
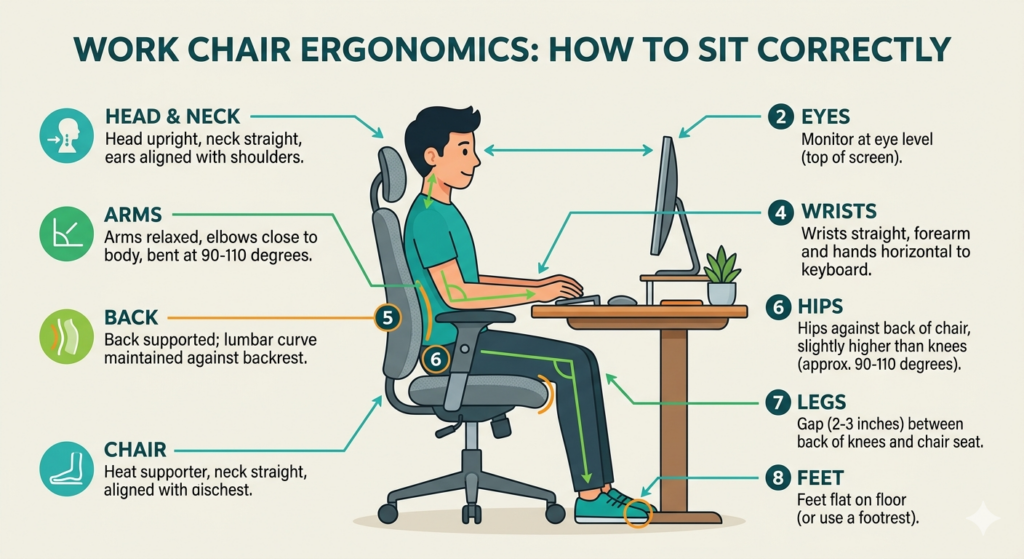
Table of Contents
- The ergonomic desk setup checklist: sequence that matters
- Step 1: Chair height
- Step 2: Chair depth and back angle
- Step 3: Desk height and keyboard placement
- Step 4: Monitor height and distance
- Step 5: Armrest height
- Step 6: Mouse and peripheral placement
- Step 7: Lighting and glare
- Step 8: Secondary items in your ergonomic desk setup checklist
- The final test at the end of your ergonomic desk setup
- What this ergonomic desk setup checklist won’t fix
- The bigger picture: completing your ergonomic desk setup
The ergonomic desk setup checklist: sequence that matters
Here’s the priority order. Fix each item before moving to the next, because later items depend on earlier ones being correct:
- Chair height (determines your hand position)
- Chair depth and back angle (determines your spine position)
- Desk height and keyboard placement (derived from chair)
- Monitor height and distance (derived from seated eye level)
- Armrest height (derived from desk height)
- Mouse and peripheral placement
- Lighting and glare
- Secondary things (footrest, wrist rest, etc.)
If you skip around, you’ll end up re-doing earlier steps. Work through them in order.
Step 1: Chair height
Sit in your chair normally, with your feet flat on the floor.
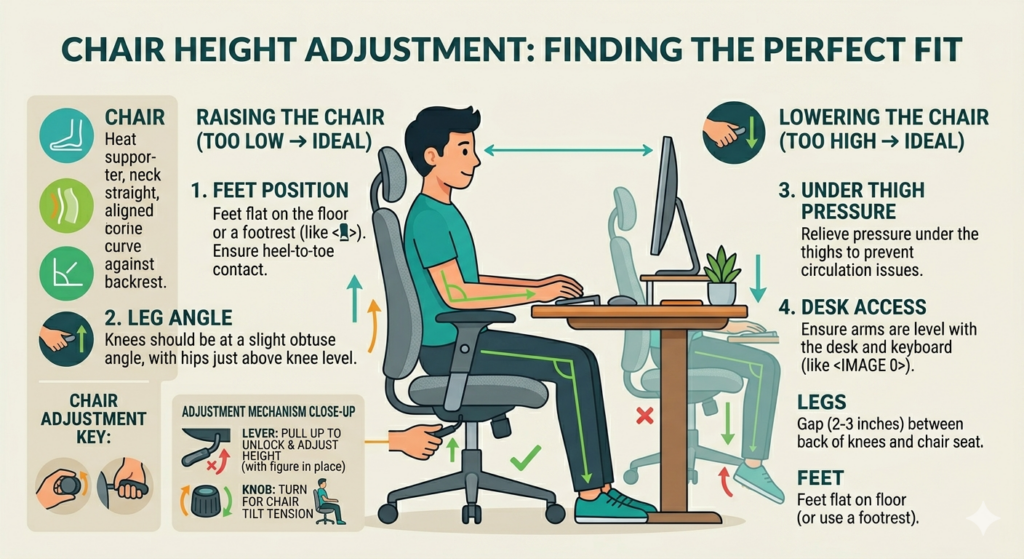
The test: your thighs should be roughly parallel to the floor, or tilted very slightly downward. Your knees should be at roughly a 90-degree angle, or slightly open (100 degrees).
The adjustment: raise or lower the chair until your feet rest flat on the floor without having to reach down with your toes, and without your thighs pressing hard against the front edge of the seat.
Common problems:
- Your feet don’t reach the floor. This usually means either the chair doesn’t go low enough, or your desk is forcing you to sit high. First try lowering the chair as much as it’ll go. If your feet still don’t reach, you need a footrest. Don’t skip this dangling feet cut off circulation and cause lower back strain within an hour.
- Your thighs press into the front of the seat. The seat is too high. Lower the chair, or adjust the seat depth if your chair has a slider (many budget chairs don’t).
- Your knees feel cramped close to your chest. The seat is too low or too deep.
Don’t move to step 2 of the ergonomic desk setup checklist until this is right.
Step 2: Chair depth and back angle
Seat depth test: with your back against the backrest, there should be two to three finger-widths of space between the back of your knee and the front edge of the seat.
If there’s less space, your knees are hyperextending or the seat is cutting off circulation behind your knees. If there’s more space, your lower back isn’t getting proper support because you’re sitting forward on the seat.
The adjustment:
- If your chair has a seat depth slider, adjust it so you have two to three fingers of clearance.
- If it doesn’t have a depth slider (most budget chairs), you need to either sit fully back (and accept less thigh support), or consider whether you bought the wrong chair for your body proportions.
Back angle test: the backrest should be reclined slightly, not straight vertical. Somewhere between 100 and 110 degrees is the ergonomic sweet spot. This is the angle where your lower back is best supported and your core muscles aren’t working to hold you upright.
The adjustment: if your chair has a tilt lock or adjustable recline, set it to just past vertical. If your chair only goes “fully upright” or “fully reclined,” the fully-upright position is usually too rigid; lock it slightly reclined if you can.
Lumbar support: if your chair has adjustable lumbar support, position the lumbar pad at the small of your back, roughly at belt level, not higher. If it’s adjustable for firmness, start firmer than you think. You’re aiming for support, not a cushion.
A chair that’s set up correctly at this point should feel like it’s doing the work of holding you up, not you holding yourself up against it. If you feel like you’re actively engaging muscles to stay seated, something’s still wrong with steps 1 or 2.
Step 3: Desk height and keyboard placement
Now that the ergonomic desk setup checklist is near complesion and you chair is dialed in, your elbow height is fixed at whatever your chair height made it. Your desk and keyboard need to match.
The desk height test: with your chair correctly set and your arms hanging relaxed at your sides, bend your elbows to 90 degrees. Your forearms should be parallel to the floor (or tilted very slightly downward, never upward). Your desk surface (or more importantly, your keyboard) should be at exactly this height.
The big issue: standard desks are 29-30 inches tall. That’s too tall for about 40% of people with chairs set correctly. If your desk is fixed-height and too tall:
- If you can raise your chair without your feet leaving the floor, do that and use a footrest.
- If you can’t, you have a desk-height problem that needs a real solution: a keyboard tray (mounts under the desk and brings the keyboard down a few inches) or eventually a standing desk with adjustable height.
Keyboard position: the keyboard should be directly in front of you, centered to your body, with maybe an inch or two of desk edge to rest your palms on when not typing.
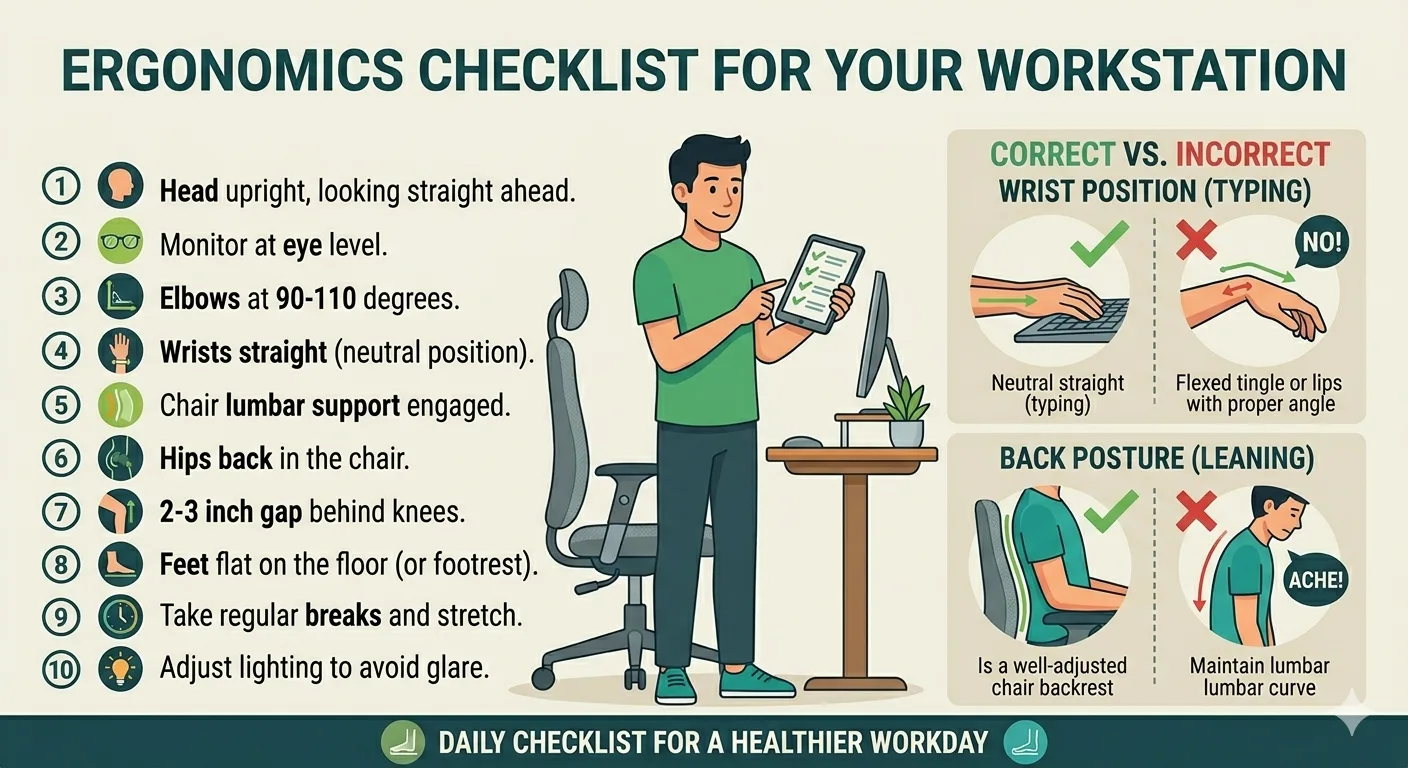
Keyboard tilt: the keyboard should be flat or slightly negatively tilted (back edge lower than front edge). This keeps your wrists neutral. The “kickstand” legs most keyboards have should stay folded down; they tilt the keyboard the wrong way for wrist health.
Step 4: Monitor height and distance
This ergonomic desk setup checklist step fixes “laptop neck” and most chronic neck/upper-back pain.
Monitor height test: sit normally and look straight ahead with relaxed eyes. Your line of sight should land on the top third of the monitor. The top of the monitor should be at or just slightly below eye level. That is the same range OSHA’s computer workstation eTool and NIOSH ergonomics guidance publish, so you don’t have to take my word for it. Don’t want to guess? Try using our free calculator here!
Why it matters: looking downward for long periods effectively multiplies the weight your neck muscles have to hold. A head looking 30 degrees down is like carrying 40 pounds instead of 10. Over hours, days, years, that wrecks your neck.
Monitor distance test: arm’s length. Extend your arm toward the screen your fingertips should just about touch it, or be one to two inches short. Roughly 20-30 inches / 50-75 cm.
Common problems:
- Your monitor is too low. Overwhelmingly the most common issue. Solutions: stack books under the factory stand (free, works immediately), buy a monitor riser (CA$25-50 (US$18-36)), or upgrade to a monitor arm for flexibility. For more on when each option makes sense, see our guide on getting your monitor at the right height.
- You’re using a laptop as your primary display. Laptop screens are below eye level by design; they’re made for short-term mobile use, not 8-hour days. Either connect an external monitor at the right height, or use a laptop stand combined with an external keyboard and mouse (the laptop stand raises the screen, the external peripherals let you still type comfortably).
- Dual monitors: where do I look? If you use both equally, position them side-by-side angled inward so the center of the pair is directly in front of you. If you use one primarily, put that one directly in front of you and the secondary off to the side.
Step 5: Armrest height
The test: with your chair and desk both correct, rest your forearms on the armrests in your typing position. Your shoulders should be relaxed: not pushed up, not sloping down.
The adjustment:
- If your shoulders shrug up to meet the armrests, they’re too high. Lower them, or if they don’t adjust, remove the armrest if possible.
- If your shoulders sag down because the armrests don’t reach your arms, they’re too low. Raise them, or add cushions.
Armrests that are the wrong height are a common source of chronic shoulder and upper back tension. They’re more important than they get credit for.
What if your armrests don’t adjust? This is where many cheap chairs fail. Fixed armrests that don’t match your body will either force your shoulders up or leave your arms unsupported. If your armrests are fixed at a clearly wrong height, either remove them (if possible) or consider whether the chair is appropriate for long-term use. A good ergonomic chair under CA$300 (US$214) should have at minimum height-adjustable armrests; 3D adjustable is better.
Step 6: Mouse and peripheral placement
Mouse placement: right next to the keyboard, at the same height. If your mouse is on a different surface than your keyboard, you’re reaching awkwardly every time you move between them.
The mouse reach test: with your elbow at your side and forearm parallel to the floor, you should be able to rest your hand on the mouse without stretching your shoulder forward. If you’re reaching, the mouse is too far away.
Mouse technique: move the mouse from your elbow, not your wrist. Wrist-based mouse movement is the biggest cause of repetitive strain injuries and carpal tunnel at a desk. A slower sensitivity setting forces larger elbow-based movements and is actually better for your wrists than high sensitivity.
Other frequently-used items: phone, notebook, water bottle, docs you reference constantly: these should all be within arm’s reach without twisting your torso. If you have to rotate or lean to grab them, they’re in the wrong place.
Items you rarely touch: chargers, extra pens, documents you’ll need next week: these can live further away. The point is to minimize repetitive reaching for things you touch often.
Step 7: Lighting and glare
This step in the ergonomic desk setup checklist doesn’t involve adjusting posture, but it’s genuinely important: chronic eye strain causes headaches, fatigue, and a cascade of small postural adjustments (leaning forward, squinting) that undo everything else you’ve set up.
The glare test: when your monitor is off (dark screen), can you see reflections of windows, ceiling lights, or yourself? If yes, you have glare that’s making your eyes work harder to read the screen.
Fixes:
- Never face a bright window while working. Position your desk so windows are perpendicular to your monitor, not behind or in front of it.
- Overhead lights shouldn’t reflect off your screen. If they do, either move the monitor, close blinds, or tilt the monitor slightly downward.
- Add a desk lamp for task lighting. Your monitor shouldn’t be the brightest thing in your visual field. A desk lamp providing ambient light reduces the contrast ratio your eyes are constantly adjusting to.
Monitor brightness: should roughly match the ambient light in the room. A screen that’s much brighter than the room is fatiguing; one that’s dimmer makes you squint. Most monitors are factory-set way too bright.
Blue light filtering: enable Night Light (Windows) or Night Shift (Mac/iOS) in the evening. The research on blue light causing permanent eye damage is thin, but the research on blue light disrupting sleep is solid. Warmer screen colors in the hours before bed genuinely help.
Step 8: Secondary items in your ergonomic desk setup checklist
Once the above are sorted, these are the nice-to-haves that make a good setup marginally better:
Footrest: only needed if your feet don’t reach the floor with correct chair height. A cheap footrest (CA$20-40 (US$14-29)) works as well as an expensive one; what matters is that your feet have firm support.
Wrist rest: controversial. Ergonomists actually recommend against resting your wrists on a wrist rest while actively typing; your wrists should float. A wrist rest is useful as a resting position between typing bursts, but not as a typing posture. Optional.
Document holder: if you reference paper documents while working, a document holder that sits next to your monitor at screen height saves a lot of neck movement. If you’ve gone fully digital, skip.
Monitor light / bias lighting: an LED strip behind the monitor reduces the contrast between the bright screen and the dark wall behind it. Surprisingly effective for reducing eye strain. Cheap ones (CA$15-25 (US$11-18)) work fine.
Cable management: cables catching on chair wheels, tangling, getting pulled, or creating dust traps under your desk all degrade the setup over time. Worth addressing once everything else is dialed in; see our guide to cable management for what actually works.
The final test at the end of your ergonomic desk setup
After working through the ergonomic desk setup checklist, sit at your desk and work for an hour. Then check:
- Shoulders: relaxed, not hunched up or forward
- Neck: neutral, not tilted down or craned up
- Wrists: straight, not bent up or down
- Lower back: supported, not unsupported or rounded
- Thighs: supported, feet flat on floor or footrest
- Eyes: not dry, not squinting, not strained
If any of those are wrong after an hour, trace back up the checklist to find the step that’s still not right. The checklist order is prioritized: if your neck hurts, the issue is almost always the monitor (step 4). If your shoulders hurt, it’s usually the armrests (step 5) or desk height (step 3). If your lower back hurts, it’s almost always the chair (steps 1-2).
What this ergonomic desk setup checklist won’t fix
Being honest about limits:
Existing chronic pain. If you’ve had back pain, neck pain, or RSI for months or years, ergonomic adjustment alone isn’t enough. See a physiotherapist or ergonomics specialist. A proper ergonomic setup prevents new problems; it doesn’t cure entrenched ones.
Bad habits. If you hunch forward while deep-focus working regardless of how your chair is set, no chair will fix that. Movement breaks matter; a good rule is standing up briefly every 30-45 minutes.
Working eight hours at a desk. The research consistently shows that the best posture is your next posture; no single position, even an ergonomically ideal one, is good for you all day. Alternating between sitting, standing, and short walks is better than optimizing a single static setup.
For authoritative ergonomics standards, OSHA’s ergonomics guidelines and CCOHS’s office ergonomics resources are the primary references used to build this checklist.
Ergonomic office setup: laptops and desks you don’t control
Everything above assumes the desk is yours. An ergonomic office setup at work, or a laptop at the kitchen table, follows the same sequence with a few substitutions.
A laptop on its own fails Step 3 and Step 4 at the same time: if the keyboard is at the right height the screen is too low, and if you raise the screen your wrists come up with it. The fix is cheaper than any chair. Put the laptop on a stand so the top third of the screen hits eye level, then add an external keyboard and mouse so your elbows stay at desk height. Our laptop stand guide covers which ones hold a screen steady without wobble.
In a shared office you usually can’t swap the furniture, but Steps 1, 2, 4, and 5 still work: chair height, seat depth, monitor height, and armrests are adjustable on almost every office chair and monitor made in the last decade. If the desk is fixed and too tall, raise the chair until your elbows are right and put a footrest (or a ream of paper) under your feet. If you’ve talked the office into sit-stand desks, the same checklist applies at both heights, and my Uplift V3 review covers what that upgrade actually buys you.
And if you just want the short answer to how to set up a desk: feet flat, elbows at desk height, top third of the screen at eye level. Get those three right and the rest of the checklist is refinement.
Ergonomic Desk Setup FAQ
What is the correct desk height for typing?
For most adults, somewhere between 66 and 76 cm (26 to 30 inches), but the real answer depends on your body: your elbows should sit at roughly 90 degrees with shoulders relaxed. Our desk height calculator gives you a personalized number from your height in about ten seconds.
Should your monitor be at eye level?
The top third of the screen should sit at eye level, not the center. If you find yourself tilting your head down more than slightly, the monitor is too low. The monitor height calculator does this math for your specific screen size and sitting height.
Is an ergonomic desk setup worth it without an expensive chair?
Yes. The sequence in this checklist matters more than any single purchase. A correctly adjusted budget chair beats a badly adjusted premium one, and most of the steps here, monitor height, keyboard placement, lighting, cost nothing. If you do want to upgrade, our guide to ergonomic chairs under CA$420 (US$300) covers the honest options.
How often should you take breaks at a desk?
The common guidance is a posture change every 30 minutes and a short walk every hour. CCOHS recommends micro-breaks built into the workday rather than saving movement for lunch. No setup, however correct, replaces movement.
The bigger picture: completing your ergonomic desk setup
The ergonomic desk setup checklist is not perfect and the perfect ergonomic setup doesn’t exist. What exists is a setup that fits your body, lets you work without pain, and accommodates your natural movement during the day. This checklist gets you 90% of the way there with what you probably already own.
If you’ve worked through it and identified specific gaps (your chair doesn’t adjust, your monitor is genuinely too low, your desk is the wrong height), you now have a prioritized shopping list based on real need rather than marketing. Start with whichever step you couldn’t get right without new equipment, and work outward from there.
The goal is a setup you can forget about. Pain that doesn’t come back, eyes that don’t ache at the end of the day, a body that can sit for a focused morning and still stand up feeling normal at lunch. That’s the outcome. The ergonomic desk setup checklist is just the path.
8 responses to “Ergonomic Desk Setup Checklist”
-
[…] budget chair buyers make is treating the chair as the only ergonomic variable when the whole desk setup […]
-
[…] ergonomic rule, repeated across OSHA, the Canadian Centre for Occupational Health and Safety, and every […]
-
[…] narrowed, but it still exists at the budget end. If you’re pairing your monitor with a proper ergonomic desk setup, VESA compatibility and height adjustment matter. Check before you […]
-
[…] your lower back, and your feet are flat on the floor. The stand is one piece of the setup; the ergonomic desk setup checklist covers the full sequence if you want to dial everything in […]
-
[…] a vibrating reminder to sit straighter is treating symptoms rather than causes. Sort out your ergonomic setup first. Add a wearable later if you want the extra […]
-
Very helpful thank you!
-
[…] your back, and your desk isn’t a cable disaster. If that side of things needs work, the ergonomic desk setup checklist is a practical place to start, and if you’re running a laptop as your main machine, a decent […]
-
[…] add a monitor arm, do that first. Moving cables is much easier before they’re organized. The ergonomic desk setup checklist covers the positioning decisions that should come before you start routing. And if a monitor arm is […]
Two more quick ergonomic checks: use our monitor viewing distance calculator to confirm your screen is at the right depth for your display size, and our sleep cycle calculator to time your rest so you wake between REM cycles; not in the middle of one.
Some links in this guide may be affiliate links. See our affiliate disclosure for details.
One more tool worth a minute: the office chair fit calculator turns your body measurements into the seat height, depth, and width numbers to look for before you buy anything.
Leave a Comment