
Standing desk cable management is a different problem from regular desk tidying, because your desk moves and your cables have to survive the trip. Get it wrong and a cable pulls taut at full height, strains a connector, or snags on the frame every time you stand. Get it right once and you forget it exists. The whole job comes down to one number most people never measure: how far your desk actually travels.
This guide walks the moving-desk version of the problem from that measurement outward: how much slack each cable needs, where the power bar goes, and how to route everything so it flexes instead of frays. It assumes you already own or are buying a sit-stand desk; if you are still deciding, start with whether standing desks are worth it first.
Table of Contents
- Measure the travel before you buy anything
- Standing desk cable management: how much slack
- Where the power bar goes
- What each piece of gear actually does
- Routing each cable so it flexes, not frays
- Test at both heights, then the safety check
- Renter-safe options
- The Canadian bill of materials
- Standing Desk Cable Management FAQ
- The Short Version
Measure the travel before you buy anything
Set your desk to its lowest sitting height and measure from the floor to the underside of the top. Now raise it fully and measure again. The difference is your travel, and for most sit-stand desks it lands between 16 and 25 inches (41 to 63 cm). That single number sizes every decision that follows, so write it down before you spend a dollar on trays or sleeves.
Why it matters: every cable that runs from something fixed, like a wall outlet, up to the moving desktop has to stretch by exactly that travel distance each time you stand. If the cable is only just long enough at sitting height, it goes guitar-string tight at standing height and something eventually gives, usually the connector.
Standing desk cable management: how much slack
Here is the rule that makes standing desk cable management work: give every moving cable slack equal to your full travel, plus a service margin of about 6 inches (15 cm) so it is never taut and never dragging. Measure the slack at the lowest desk height, because that is when the cable is at its most bunched. If it looks tidy sitting down and disappears standing up, you sized it right.
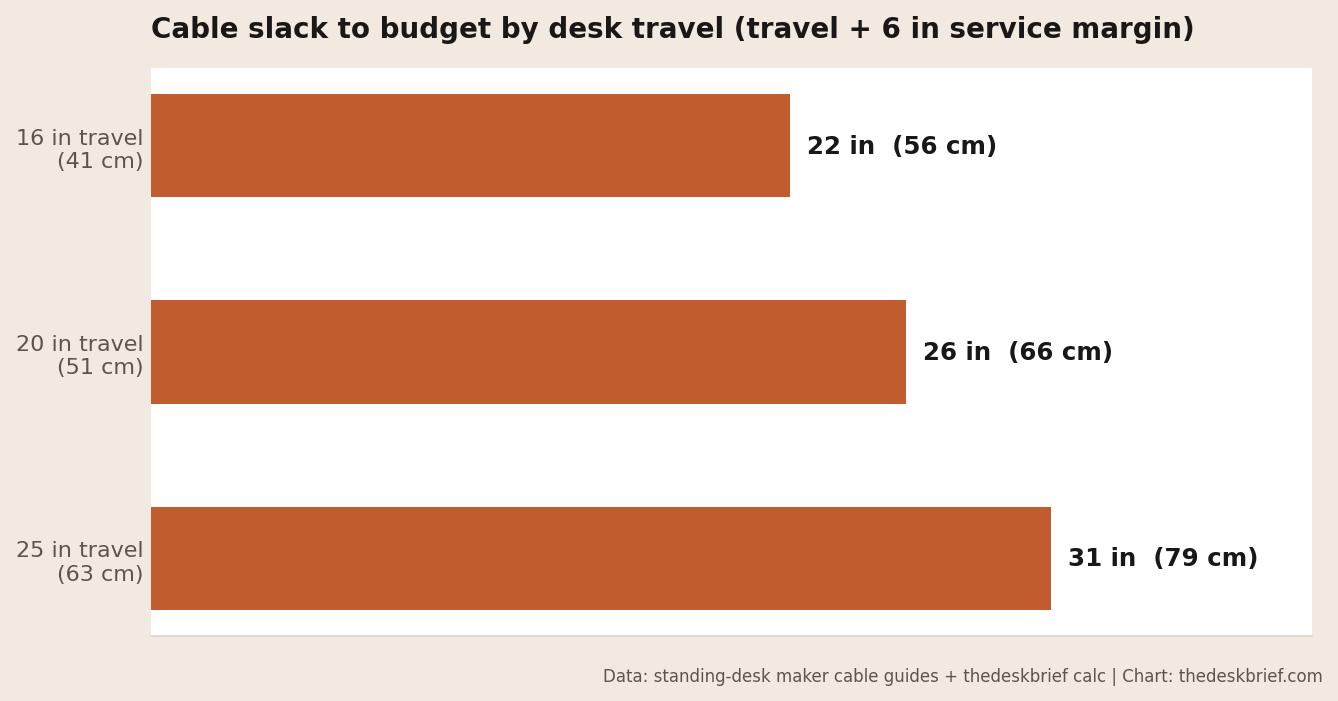
A worked example: say your desk travels 20 inches. Each moving cable needs about 26 inches of slack beyond the point where it leaves a fixed anchor. Coil that extra length into a loose loop and let a cable spine or tray guide it, so the slack flexes as one managed bundle instead of a nest of individual wires fighting each other.
Where the power bar goes
This is the single decision that makes or breaks a moving desk. Mount the power bar to the underside of the desktop, not to the wall or floor. When the power strip rides with the desk, every device plugged into it, monitor, laptop dock, charger, moves as one unit, and only one cable has to travel: the single cord from the strip down to the wall.
That is the trick that turns six moving cables into one. Give that one main drop its full slack from the chart above, and everything upstairs on the desk stays still relative to itself. Uplift and other makers build this pattern into their desks for a reason, as their own standing desk cable guide lays out, and it is the first thing I check in any Uplift V3 review style setup.
What each piece of gear actually does
You do not need all of it. For a moving desk, each item has one job:
- Under-desk cable tray: holds the power bar and the bulk of the slack, riding with the desk
- Cable spine (vertical wrap): the flexible sleeve that guides the one main drop as it extends and retracts
- Cable sleeve: bundles the on-desk cables so they move together, not individually
- Velcro ties, never zip ties: let cables shift at the constraint point so flex stress spreads instead of concentrating, and make changes a ten-second job
The cable spine is the part people skip and then regret. Without it, your one main drop droops into a loop that catches on the desk legs or the floor on every cycle. For the static parts of the run, the wall-to-floor section that never moves, ordinary cable management gear like raceways and clips does the job fine.
Routing each cable so it flexes, not frays
Work outward from the desk-mounted power bar. Monitor and laptop-dock cables stay on the desk and plug into the traveling strip, so they never see the travel at all. The power brick for a laptop or monitor should sit in the tray with the strip, not dangle, because a heavy brick swinging on its cable is a strain point waiting to fail.
Ethernet is the one cable people forget is fragile. Its clip tab snaps easily under repeated tension, so route it with the same full slack as power and let the spine carry it. Anything that genuinely has to run from a fixed wall point to the moving desk, gather into that single guided drop rather than sending three separate wires on the journey.
Test at both heights, then the safety check
Before you call it done, cycle the desk. Run it to full standing height and watch the main drop: nothing should pull tight, and no connector should take tension. Then drop it to full sitting height and watch again: the slack should gather into a guided loop, not pile on the floor where it can be rolled over by a chair caster.
Two safety notes worth taking seriously. Do not coil a power cable tightly against a power brick or another heat source, because bundled cables under load can run warm and tight coils trap that heat. And keep the main drop clear of the desk’s moving mechanism and feet, a pinch point that will chew through insulation over months. FlexiSpot and other makers flag the same hazards in their cable management guidance.
Renter-safe options
Everything above works without drilling. Under-desk trays and cable spines clamp or screw into the desk itself, which is yours to modify, not the wall. For the static wall-to-floor run, use raceways with removable adhesive rather than screw-in channels, and skip anything that anchors into a wall you do not own. When you move out, the adhesive peels and the desk-mounted gear comes with you.
The Canadian bill of materials
A complete moving-desk setup runs roughly CA$70 to CA$110 (about US$50 to US$79), checked in Canada in July 2026. The pieces: an under-desk tray for the strip and slack (about CA$35 to CA$55), a cable spine for the main drop (about CA$25 to CA$40), a pack of velcro ties (about CA$10), and a sleeve for the on-desk bundle (about CA$10 to CA$15). Prices drift, so treat these as the shape of the spend, not a quote.
You likely already own the power bar, which keeps this cheaper than a full desk-tidy from scratch. If you want to plan the whole surface before you buy, the desk space planner checks whether your gear actually fits, and the cable management reference sheet is a printable checklist for the routing steps above.
Standing Desk Cable Management FAQ
How much cable slack does a standing desk need?
Slack equal to your desk’s full travel plus about 6 inches (15 cm). Measure travel by comparing the lowest and highest desk heights; for most sit-stand desks that is 16 to 25 inches, so budget roughly 22 to 31 inches of slack per moving cable.
Should the power strip be mounted to the desk or the wall?
To the desk. Mounting the power bar under the moving top means only one cable has to travel, the single drop to the wall, while everything plugged into the strip moves with the desk and never flexes.
Are zip ties bad for a standing desk?
On moving cables, yes. Zip ties clamp a cable at one fixed point, so all the flex stress concentrates there and the cable eventually fatigues. Velcro ties let the cable shift slightly, spreading the stress, and they make future changes trivial.
Can I do standing desk cable management without drilling the wall?
Yes. Trays and spines mount to the desk itself, and the static wall run can use removable-adhesive raceways. Nothing needs to anchor into a wall, which makes the whole setup renter-safe and portable.
The Short Version
Measure your desk’s travel, mount the power bar under the moving top so only one cable makes the trip, and give that main drop slack equal to the travel plus 6 inches, guided by a cable spine. Use velcro instead of zip ties, keep the drop clear of the mechanism and any heat source, and test at both heights before you call it done.
Done right, standing desk cable management is a one-evening job under CA$110 that you never think about again. The moving desk stops being a cable problem and goes back to being the reason you bought it.